深入解读-如何用keycloak管理external auth

文章目录

  1. 1. 初探OAuth
    1. 1.1. 初始化oidc client
    2. 1.2. 生成auth url
    3. 1.3. auth callback换取token
  2. 2. 使用keycloak IDP
    1. 2.1. keycloak 配置
    2. 2.2. keycloak auth接入
  3. 3. 方法一: token-exchange
    1. 3.1. 相应keycloak配置
    2. 3.2. 代码实现
  4. 4. 方法二:broker 读取 stored token
    1. 4.1. 相应keycloak配置
    2. 4.2. 代码实现

提到OAuth2,大家多少都有些了解。

不了解的话可以先看下之前的简单聊聊鉴权背后的那些技术先回顾一下基本概念和流程。

简单来说,以google授权为例,一般就是通过用户授权页面登录google账号,再跳转用code换取到相应权限的token,就可以代表用户去发起一些google api的请求。

直接代码实现这套授权逻辑并不复杂,不过如果还需要接入facebook授权,instagram授权呢,总不能挨个去实现一遍吧。

最好能有一套通用的解决方案来解放双手, 今天我们就聊聊如何用keycloak实现一套通用的身份验证和授权管理方案。

提前说明,无法本地复刻的技术方案不利于理解,也不利于方案探讨。虽然本文章所用代码是使用了rustaxum框架(为啥?因为rust is future!)+keycloak,但从服务启动到keycloak服务及相关配置,都用docker-compose+terraform+shell 脚本化管理,可100%本地复刻,欢迎本地尝试。(当然我说的是Mac下)代码地址: https://github.com/NewbMiao/axum-koans

初探OAuth

在引入keycloak之前我们以google为例先看下常规OAuth怎么接入,方便后边和keycloak接入对比。

前置工作: 获取google OAuth applicationclientIdclientSecret,不清楚的话,可以参考 Create a Google Application in How to setup Sign in with Google using Keycloak

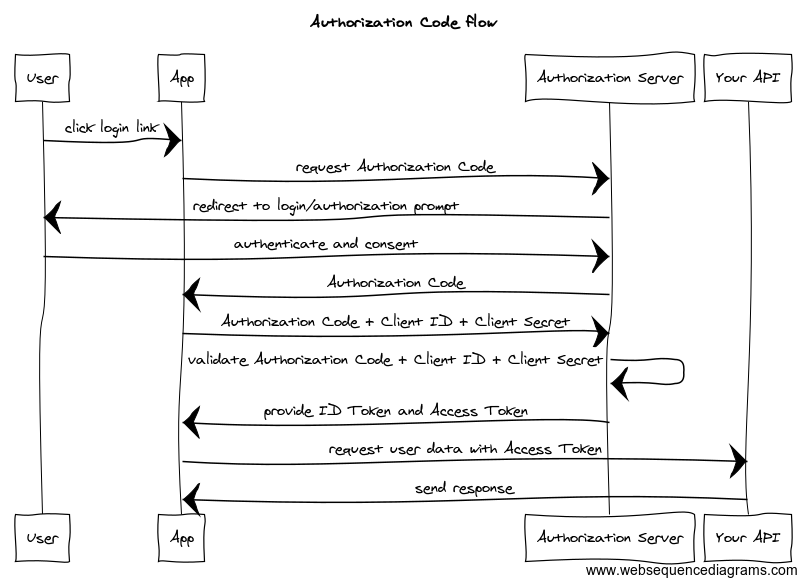
如下图,一般授权流程(standard flow)中客户端和auth server主要是两个阶段

  • 生成auth url跳转登录后请求换取授权令牌的code
  • auth callback中用code换取token,得到能代表用户的credentials,一般是accessToken

Authorization Code flow for OAuth

这个流程自己也可以实现,但一般都用oidc client(其实现了OpenID connect协议,是建立在OAuth2.0上的身份验证协议,用来为应用提供用户身份信息)来实现。

编程语言实现上大同小异,下边代码以rustoauth2库为例讲解

如果不熟悉rust,可以重点看代码注释,也不影响理解

初始化oidc client

1
2
3
4
5
6
7
8
9
10
11
12
13
14
15
16
17
18
// src/extensions/google_auth.rs@GoogleAuth::new
// 注册auth server 的授权登录地址,授权时会生成带有相应参数的 auth url
let auth_url =
AuthUrl::new("https://accounts.google.com/o/oauth2/v2/auth".to_string()).unwrap();
// 注册auth server 的授权登录成功后要跳转到的客户端地址(auth callback url),会携带code
let redirect_url = RedirectUrl::new(config.redirect_url).unwrap();
// 注册auth server 的code换取token的地址
let token_url =
TokenUrl::new("https://www.googleapis.com/oauth2/v3/token".to_string()).unwrap();

let client = BasicClient::new(
// 注册google application client credentials, 会有相应权限和客户端限制,如web application类型会有访问地址origin及callback地址的白名单限制
ClientId::new(config.client_id),
Some(ClientSecret::new(config.client_secret)),
auth_url,
Some(token_url),
)
.set_redirect_uri(redirect_url);

生成auth url

1
2
3
4
5
6
7
8
9
10
11
12
13
14
15
16
// src/extensions/google_auth.rs@GoogleAuth::auth_url
let (url, csrf_token) = client
// 参数是用于生成state的函数,这里用csrftoken,可以在auth callback中校验state参数是否合法
.authorize_url(CsrfToken::new_random)
// auth请求需要的权限(scope),一般获取用户信息的话,profile和email就好了
.add_scope(Scope::new(
"https://www.googleapis.com/auth/userinfo.profile".to_string(),
))
.add_scope(Scope::new(
"https://www.googleapis.com/auth/userinfo.email".to_string(),
))
// 需要显示OAuth需要授权的内容给用户来确认是否同意,就是我们常见的google授权确认页面
.add_extra_param("prompt", "consent")
// 允许应用程序获得长期有效的访问令牌(accessToken)和刷新令牌(refreshToken)
.add_extra_param("access_type", "offline")
.url();

这里参数access_type=offline对于应用需要长期accessToken是很关键的。一般accessToken都有过期时间,如果没有有效的refreshToken来刷新accessToken,就会有accessToken失效后还要用户再登录的尴尬局面-_-!

另外为安全考虑除了可以用state做请求合法校验,还可以用PKCE(Proof Key for Code Exchange)来加强, 实际用到的代码有实现,感兴趣可以看下

auth callback换取token

1
2
3
4
5
6
7
8
9
10
11
12
// src/extensions/google_auth.rs@GoogleAuth::get_tokens
// 校验请求,state及pkce, 这里省略展示
// code 换取token
let mut res = client.exchange_code(code);

// 请求发送,axum中不能使用block请求,防止阻塞框架的异步事件循环
let res = res.request_async(async_http_client).await?;

Ok(TokenInfo {
refresh_token: res.refresh_token().unwrap().secret().to_string(),
access_token: res.access_token().secret().to_string(),
})

这部分不复杂,按文档配好本地,可以访问http://localhost:8000/google/auth来尝试上述flow

使用keycloak IDP

keycloak 配置

上边流程怎么让keycloak这个身份和访问管理系统接管呢,答案是使用keycloak IDP (Identity provider)

我们先看下需要如何配置相应配置,这里先用terraform - keycloak provider 展示下配置。

等效的页面配置可以后边参考之前的链接 How to setup Sign in with Google using Keycloak

1
2
3
4
5
6
7
8
9
10
11
12
13
14
15
16
17
18
19
20
21
22
23
24
25
26
27
28
29
30
31
32
33
34
35
36
37
38
39
40
41
42
43
44
45
46
47
48
49
50
# 这里使用默认的admin-cli配置keycloak
# 也可生成一个专门的client,用clientId+clientSecret的方式
provider "keycloak" {
client_id = "admin-cli"
url = "http://localhost:8080"
username = "***"
password = "***"
}

# 1. 创建一个realm(领域),并启用, 类似命名空间,代表一个安全的独立区域
resource "keycloak_realm" "realm_axum_koans" {
realm = "axum-koans"
enabled = true
}

# 2. 添加google idp, 这里需要google client credentials

resource "keycloak_oidc_google_identity_provider" "google" {
realm = keycloak_realm.realm_axum_koans.id
# client_id和secret通过环境变量获取
client_id = var.google_client_id
client_secret = var.google_client_secret
trust_email = true
# "*" 则不约束使用此idp的domain
hosted_domain = "*"
sync_mode = "IMPORT"
provider_id = "google"

default_scopes = "openid profile email"
}

# 3. 添加将要用来google auth打交道的client
resource "keycloak_openid_client" "client_axum_koans" {
realm_id = keycloak_realm.realm_axum_koans.id
name = "axum-koans"
enabled = true


client_id = "axum-koans"
client_secret = "***"
standard_flow_enabled = true

access_type = "CONFIDENTIAL"
# 配置auth callback url
valid_redirect_uris = [
"http://localhost:8000/keycloak/login-callback"
]
web_origins = ["*"]
use_refresh_tokens = true
}

别看代码版的配置稍微有点多,主要配置其实就只有注释里的三处,然后google OAuth的代理设置就完成了,不信我们继续往下看怎么代码接入

keycloak auth接入

上边keycloak配置了realm,后边授权和token获取都会和这个realm下的issueUrl打交道,这里issueUrl就类似googleauth server 地址。

  1. 初始化keycloak oidc client
1
2
3
4
5
6
7
8
9
10
11
12
13
14
15
16
17
18
// src/extensions/keycloak_auth.rs@KeycloakAuth::new

// 我们配置生成的issue_url将会是: http://localhost:8080/realms/axum-koans

// 设置token url, auth url 和auth callback url(redirect url)
let token_url = TokenUrl::new(get_url_with_issuer(
&config.issuer_url,
"/protocol/openid-connect/token",
))
.unwrap();
let auth_url = AuthUrl::new(get_url_with_issuer(
&config.issuer_url,
"/protocol/openid-connect/auth",
))
.unwrap();
let redirect_url = RedirectUrl::new(config.redirect_url).unwrap();
let client = BasicClient::new(client_id, Some(client_secret), auth_url, Some(token_url))
.set_redirect_uri(redirect_url);
  1. 生成auth_url

方法基本和之前google配置一模一样。

这里也能看出为啥需要oidc协议,其实就是抽象化,提供了一种安全、标准化和可扩展的身份验证和授权协议。它简化了应用程序中的身份管理和访问控制,提供了一致的用户登录体验,并提高了应用程序的安全性。

这里auth url默认跳转的是keycloak登录页面,然后google idp是作为一种登录选项让用户选择。但如果就打算让用户直接google登录,可以跳过keycloak登录页。

方法是使用客户端建议的idp(kc_idp_hint):Client-suggested Identity Provider

这样就可以直接使用指定的idp进行授权登录

代码如下

1
2
// src/extensions/keycloak_auth.rs@KeycloakAuth::auth_url
client.add_extra_param("kc_idp_hint", "google")
  1. auth callback换取token

方法也同 google auth callback, 这里不赘述了。

不过这里拿到的是keycloaktoken。要是需要googletoken怎么办?

别急,有两种办法。

方法一: token-exchange

token-exchange 是用于token交换场景,我们这里是用keycloak token换取外部google tokenexternal token

相应keycloak配置

token-exchange目前还是keycloak预览(preview)功能,需要至少在features中启用admin-fine-grained-authz,token-exchange才可使用(详见keycloak docker-composer配置 )

1
2
3
4
5
6
7
8
9
10
11
12
13
14
15
16
// 启用idp获取refresh token
resource "keycloak_oidc_google_identity_provider" "google" {
...
# for token exchange to get google access token
request_refresh_token = true
}

// 启用 idp token exchange permission, 并用policy关联对应的client
resource "keycloak_identity_provider_token_exchange_scope_permission" "oidc_idp_permission" {
realm_id = keycloak_realm.realm_axum_koans.id
provider_alias = keycloak_oidc_google_identity_provider.google.alias
policy_type = "client"
clients = [
keycloak_openid_client.client_axum_koans.id
]
}

代码实现

1
2
3
4
5
6
7
8
9
10
11
12
13
14
15
16
17
18
19
20
21
22
23
24
25
26
let token_url =
format!( "{}/protocol/openid-connect/token",&self.config.issuer_url);
let response = Client::new()
.post(token_url)
.form(&[
// token exchange type
(
"grant_type",
"urn:ietf:params:oauth:grant-type:token-exchange",
),
// 传入keycloak access token
("subject_token", &access_token),
("client_id", &self.config.client_id),
("client_secret", &self.config.client_secret),
// 请求换取google access token
(
"requested_token_type",
"urn:ietf:params:oauth:token-type:access_token",
),
// 要换取的external idp: google
("requested_issuer", "google"),
])
.send()
.await?;
// json deserialized as access token
Ok(from_str(&response.text().await?)?)

这样就获取到了可用的google access token, 实际上内部是通过google refresh token换取到的。

这样常规请求没问题了,只要你有keycloak access token, 就能换取到google access token来请求google api。so easy?!

方法二:broker 读取 stored token

然而,要是需要google refresh token怎么办?

有些场景是客户端需要自己通过google refresh token换取access token来发起请求的,难道这个时候客户端先去拿个keycloak access token么。。。?

这就可以用Retrieving external IDP tokens

底层实现是授权时存储了external token,再配合添加broker read token权限给生成的用户,就可以用keycloak access token换取存储的external access token + refresh token.

相应keycloak配置

1
2
3
4
5
6
7
8
resource "keycloak_oidc_google_identity_provider" "google" {
...
# for retrieve idp token (with refresh token)
// 存储idp token
store_token = true
// 用户生成是添加broker read token 权限
add_read_token_role_on_create = true
}

题外话:这里add_read_token_role_on_create对应的配置在21.1.1版keycloak admin页面没有,但admin api确可以设置,也是很tricky

代码实现

就是直接换取refresh_token, 请求地址指明对应的idp即可

1
2
3
4
5
6
7
8
9
10
// src/extensions/keycloak_auth.rs@KeycloakAuth::get_idp_token
let token_url = format!( "{}/broker/google/token",&self.config.issuer_url);
let response = Client::new()
.get(token_url)
.bearer_auth(access_token)
.header(CONTENT_TYPE, HeaderValue::from_static("application/json"))
.send()
.await?;
let res = response.text().await?;
Ok(from_str(&res)?)

题外话:当然直接给用户这么获取refresh token的能力并不安全,还需要考虑对broker read token接口的访问约束等来更好的保证安全token换取。

上边keycloak授权方案可以本地配好环境后,用http://localhost:8000/keycloak/login 来尝试。


好了,keycloak如何管理external auth到这里就结束了。以上是我在使用keycloak的一些摸索和思考,欢迎大家一起探讨。

再次附上本文的代码地址以供验证:https://github.com/NewbMiao/axum-koans

如有疑问,请文末留言交流或邮件:newbvirgil@gmail.com 本文链接 : https://newbmiao.github.io/2023/06/18/auth-manage-via-keycloak.html